
Author: Evan Smith 11/29/2019
This tutorial covers step by step how to easily make a Windows provisioning profile using Windows Imaging and Configuration Designer.
The purpose of using a provisioning profile is to be able to set up multiple computers with a flash drive and a few minutes. Doing this avoids using Cortana, needing to go through the initial setup prompts, as well as a bunch of other automatic configurations that we will soon look at.
What can Windows Provisioning do?
You can have the provisioning service automatically set up your device with a name, a product key, a network, a set local admin account, Azure AD account, or Active Directory account. You can auto install applications and add necessary certificates to get your machine going.
Initial Requirements:
- 8 GB+ Flash Drive
- Windows 10 Machine with at least 6 Gigabytes of free space
- The Fresh Windows 10 installation waiting to be configured.
How to use Windows Imaging and Configuration Designer
1.1 Installation
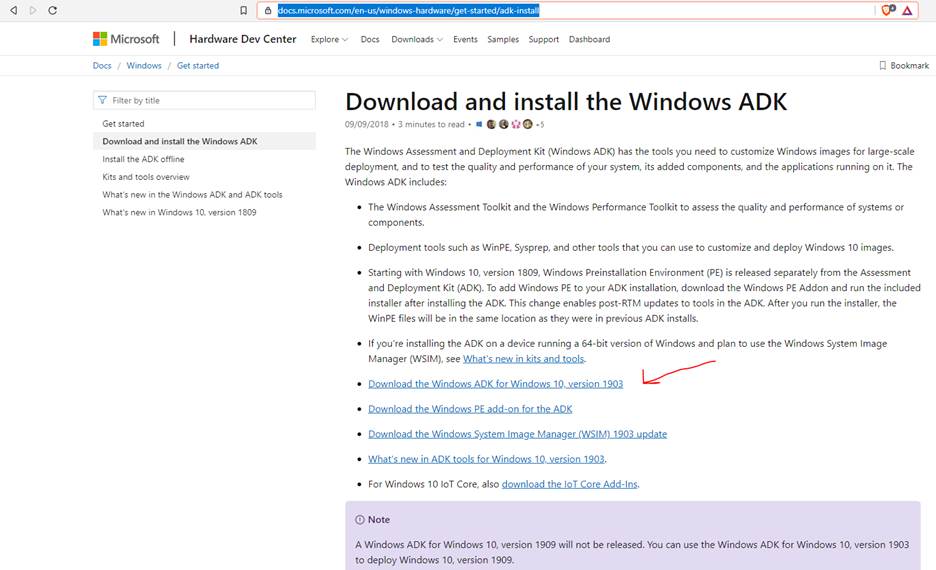
First, go to the following link and install Windows ADK for Windows 10. This kit installs a variety of tools including the one we will be using. The Microsoft Installation Page is Here.
1.2 Opening the Installer
Once you save the installer, let it download, then go to the download location. Double click the installer adksetup.exe and follow the prompts to install it on your machine. Make sure you choose Windows Imaging and Configuration Designer as a product to download.
2.1 Working with Windows Imaging and Configuration Designer
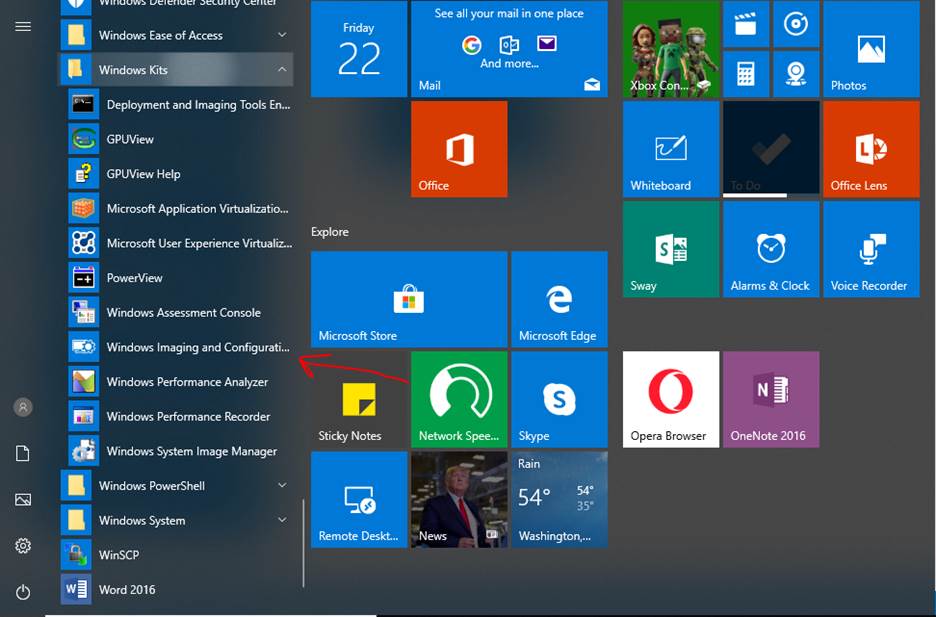
With Windows ADK successfully installed, we can now move forward to making our first provisioning profile. Go to your home menu and locate “Windows Kits”. From there select “Windows Imaging and Configuration Designer”.
2.2 Creating your Project
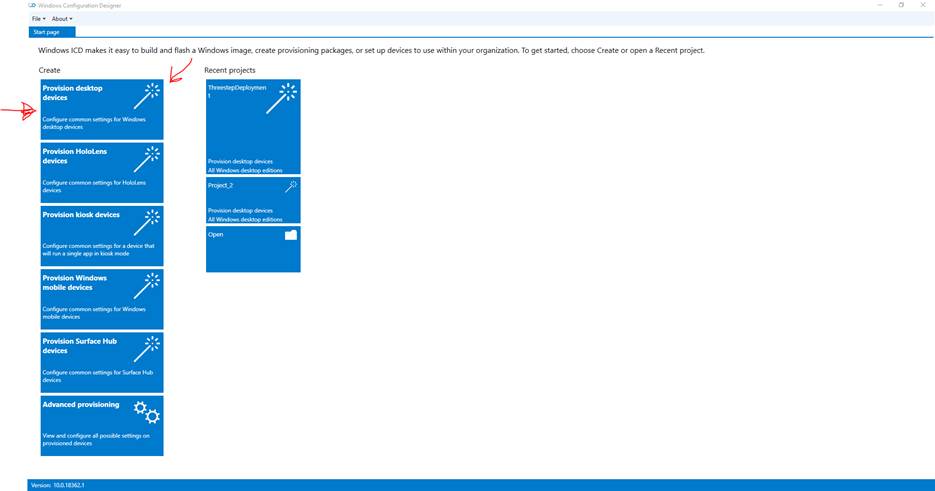
Since we will be working with a desktop device, select “Provision desktop devices” under “Create”.
2.3 New Project
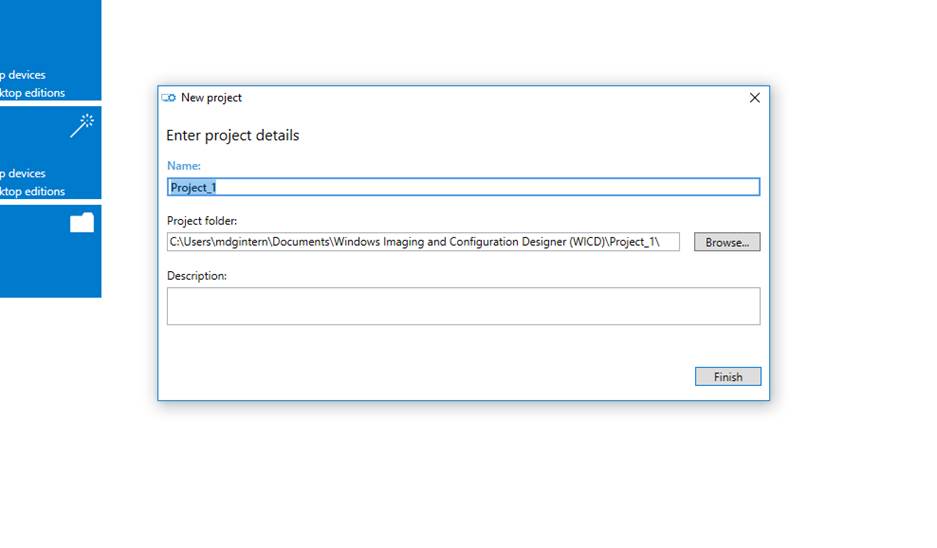
In the New Project pop up, enter the name of your project, confirm the folder where this project will be saved for future access, and enter a description if you wish. Once finished, press “Finish.”
2.4 Setting Up a Device
You have now begun your first project. We start this small journey in the “Set up device” Tab. In this menu, you must give your device a name.
You can give the computer a set name, but if your are deploying to multiple PC’s, to avoid naming conflicts you should add a variable. Anything looking like %Name% is a system variable. For the naming scheme, I like to go with “Company-%SERIAL%” so the owner of the device will be clear, and the serial will make it unique.
If you want to enter a product key, this will authenticate windows for you if it isn’t already.
You have the option to configure the device for shared use. Unless you are set up for this in your domain, you should not need this.
Removing pre-installed software is a God-Send (if you believe in that). I like to remove any software on the device so we do not need to deal with it later.
Note: There are two modes for creating a Windows Configuration: Simple Editor, and Advanced Editor. In this case we will be using the Simple Editor for ease of use, but I highly recommend seeing what other features you may be able to take advantage of in the Advanced Editor.
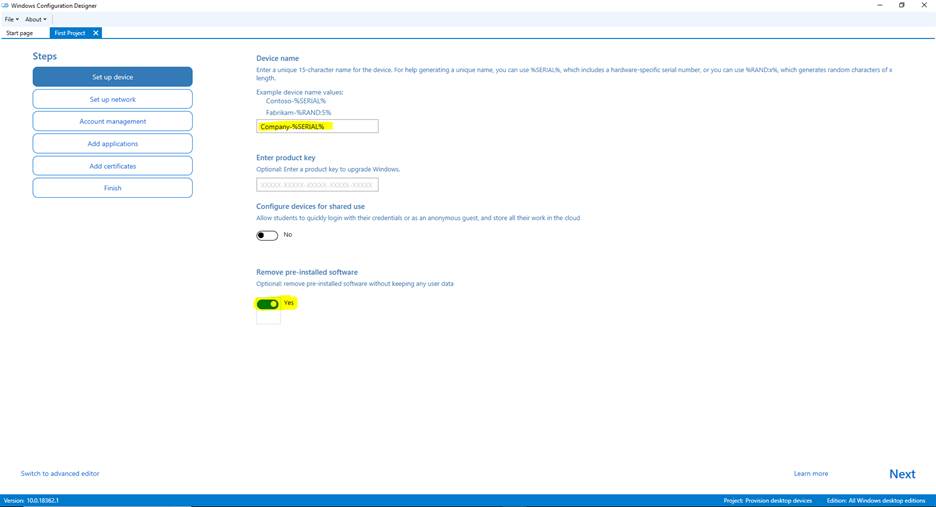
When that is completed, you will see a green check mark icon next to the “Set up device” button. This means the step is all set.
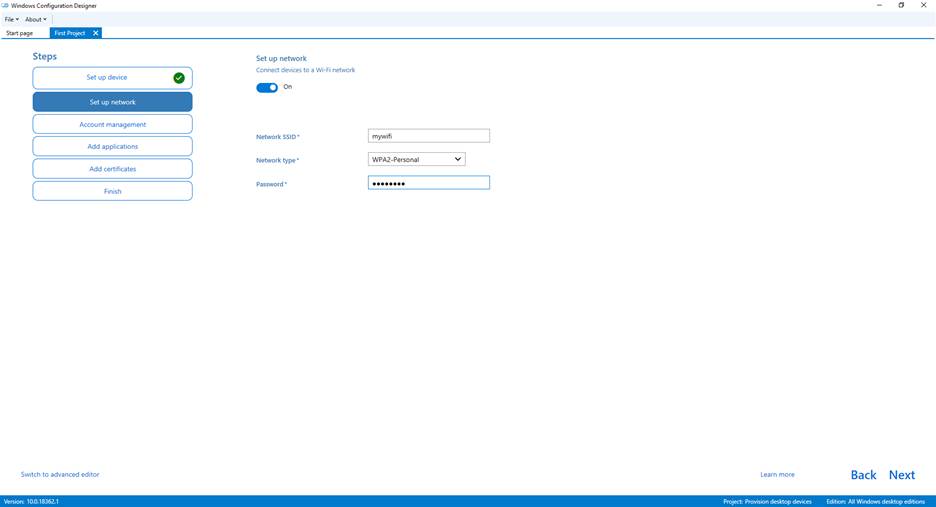
2.5 Set up your Network
Here you can set up your network settings. Turn this on and off as needed, and set up your network. You may insert your Network SSID or name and use the necessary network type.
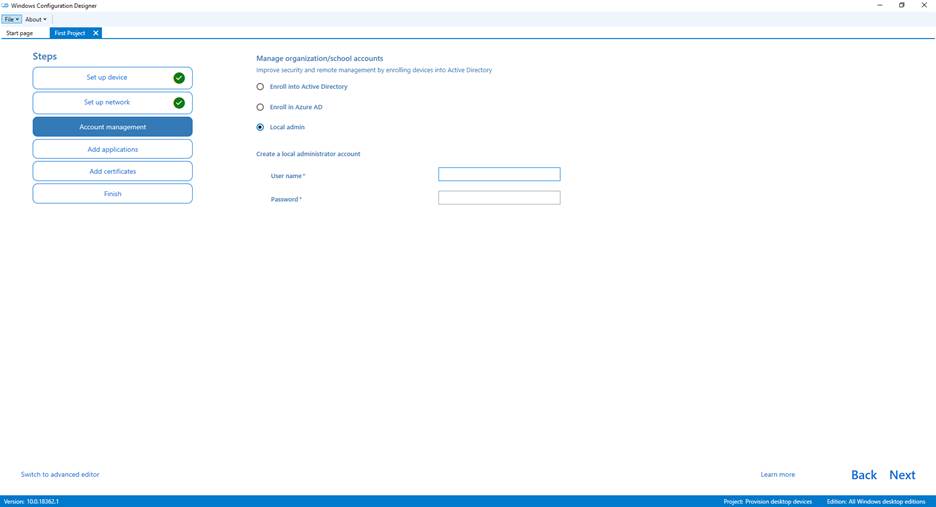
2.6 Account Management
Here you create the initial account that you will use to access the computer. You have three options: Enroll into Active Directory, Enroll in Azure AD, and local admin. For the sake of this I will create a local admin that I will use across my computers, but if your network is set up with Active Directory, your accounts will be much more versatile when connected to the domain.
Note: If your domain contains a number, adding your domain will fail. The provisioning profile has an unpassable error on this.
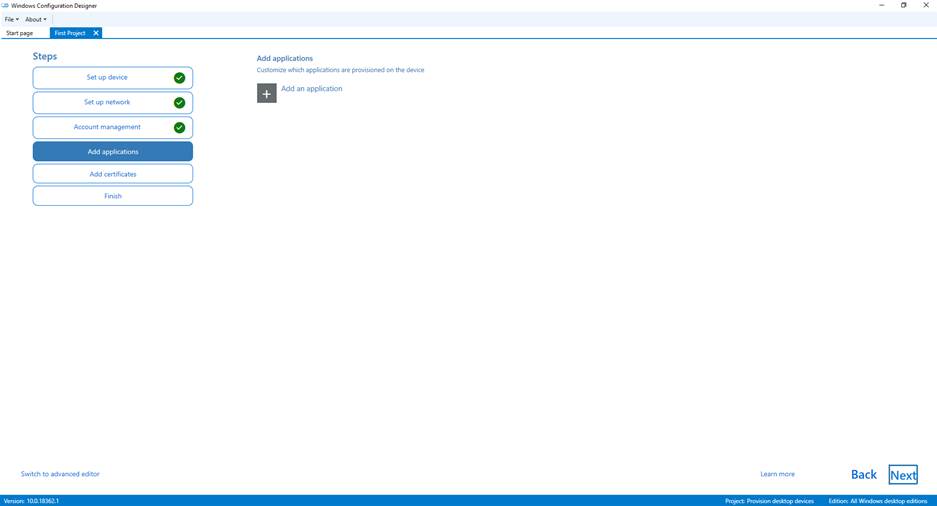
2.7 Add Applications
One of the best features (in my opinion) is the ability to auto install applications onto the device. You can skip this option, but if you want to install something, you can. For this example, we will use Google Chrome.
Note: .MSI’s is the best way to deploy software. If you can help it, you have a better chance of a successful installation when you have the right command and switches with a .MSI package.
2.7.1 Adding your application
To add your application, choose “Add an Application”.
From there click “Browse” and navigate to the application in which you want to auto install.
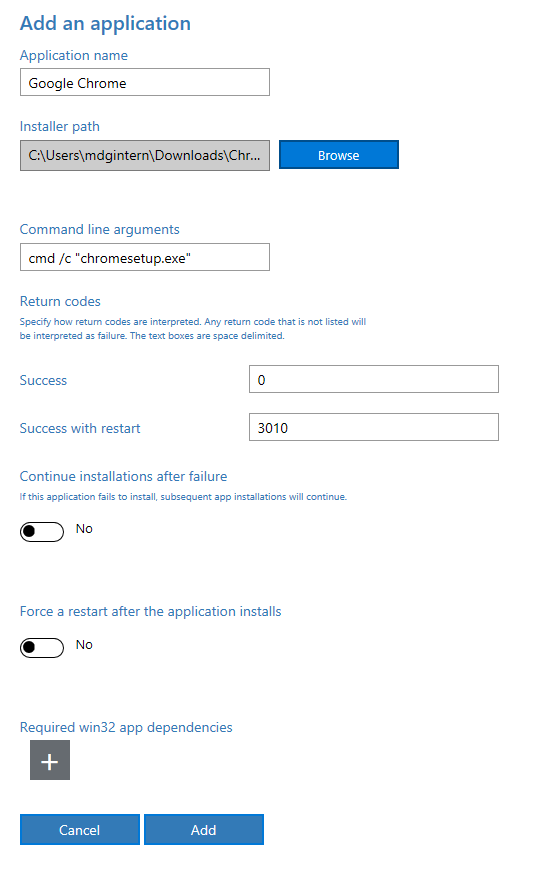
Confirm that the command to execute the exe is correct.
The return codes are standard, but you may change them if needed.
You have the option to continue installations after failure. You may change this if needed.
If your application requires a computer restart, you can Force a restart after the application installs.
Finally, if your application requires a windows 32 app dependency, you have the option to add them here.
Finish by clicking “Add” and redo the process with each other application until you have everything you want.
Note: The more you install, the longer the provisioning takes. Use a test machine to test all applications before Production. Some applications may install partially or not at all. Make sure you test all applications before production (can’t emphasize that enough…).
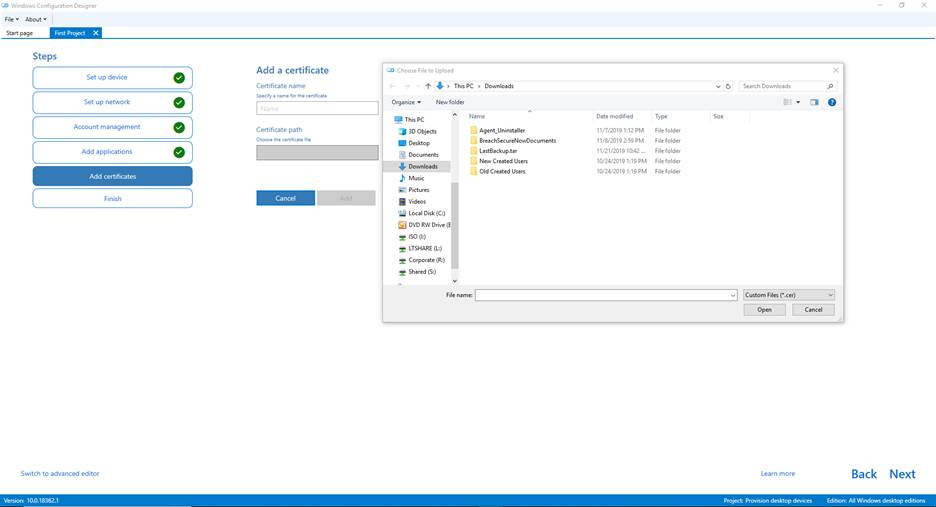
2.8 Add Certificates
Similar to adding applications, you can add certificates to your device. If you wish to add it, press “Add Certificate”, give it a name, and browse for the cert. Once completed, press “Add” and repeat as needed.
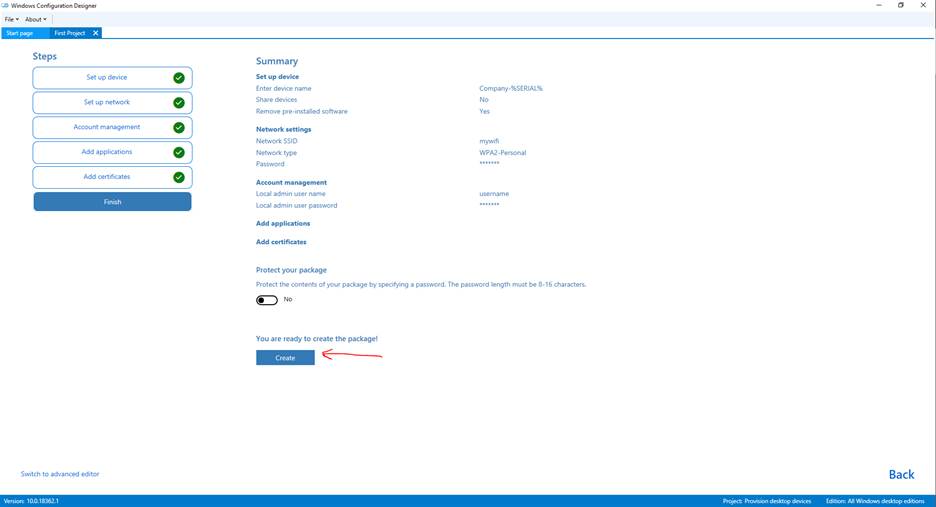
2.9 Completing your package
At the Finish menu, you will be able to review all of the information that you previously input. Make sure this information is correct.
You have the ability to “Protect your package.” I highly recommend you do this since you have put sensitive information in this package. When you password protect it, the installation cannot start unless you provide the given password.
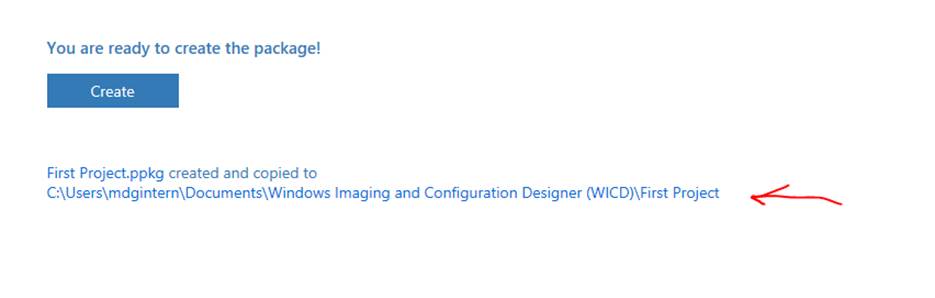
Once your are satisfied with your package, press “Create”.
3.0 Setting up your Flash Drive
Go to your project and copy all of the contents into your new flash drive. You must put all provisioning information in your root folder. Windows will not look through your flash drive for this. If it does not find the package, it will not run.
4.0 Deploying your Provisioning package.
With Windows Ready for installation, insert the flash drive into the PC. Windows will automatically ask if you want to install a provisioning package. Confirm that you want to install the provisioning package, and then insert your password as needed.
The installer will automatically copy over everything it needs. A few seconds later (when it says), you can pull out the flash drive.
Conclusion
Windows Provisioning Profile is built to save you time. Once you have your one provision stick done, all you have to do is plug and play.
At this point Windows will restart multiple times as if it were installing a major update. Once it is finished, the main screen will say “Installation is completed.” With that, you have completed your provisioning goals!
Thank you for taking advantage of this guide to help you out. Is you have any more questions about Windows Provisioning Designer, you can reference Microsoft’s Documentations for more details.
Have a good one!


Justin
I don’t typically comment on posts, but as a long
time reader I thought I’d drop in and wish you all the best during these troubling times.
I hope you stay well with the COVID19 pandemic progressing at an alarming rate.
Justin Hamilton
Hemmings
I was pretty pleased to uncover this website. I wanted to thank you for your time for this wonderful read!! I definitely really liked every bit of it and I have you book marked to see new information on your web site.
Mandala
My spouse and I stumbled over here from a different web address and thought I should check things out. I like what I see so now i’m following you. Look forward to finding out about your web page for a second time.
Valenziano
amazing artile
Delcambre
Hmm it looks like your website ate my first comment (it was super long) so I guess I’ll just sum it up what I submitted and say, I’m thoroughly enjoying your blog. I too am an aspiring blog writer but I’m still new to everything. Do you have any tips for rookie blog writers? I’d genuinely appreciate it.|
Melton
love to read
danutafawcett
Howdy! I’m at work surfing around your blog from my new iphone 4!
Just wanted to say I love reading your blog and
look forward to all your posts! Keep up the superb work!
Schnackenberg
Hello! Someone in my Myspace group shared this site with us so I came to look it over. I’m definitely loving the information. I’m book-marking and will be tweeting this to my followers! Superb blog and wonderful design and style.
Schurkamp
Hello very cool blog!! Guy .. Beautiful .. Superb .. I will bookmark your site and take the feeds additionally? I am satisfied to search out a lot of helpful info right here within the submit, we need develop extra techniques on this regard, thanks for sharing. . . . . .
Kaeding
It’s awesome to pay a quick visit this web site and reading the views of all mates regarding this article, while I am also keen of getting knowledge.
Alex
Your mode of telling all in this paragraph is genuinely pleasant, all can effortlessly know it, Thanks a lot.
Selma Bussey
Hello, everything is going nicely here and ofcourse every one is sharing data,
that’s actually excellent, keep up writing.
Werk Hoven
Hola! I’ve been following your weblog for a long time now and finally got the bravery to go ahead and give you a shout out from Huffman Tx! Just wanted to tell you keep up the fantastic job!
Bagnoli
nice to read
Northup
I have read so many articles or reviews regarding the blogger lovers however this post is genuinely a pleasant article, keep it up.
Daltorio
I am in fact grateful to the holder of this web page who has shared this great piece of writing at at this time.
smart carts
If you want to obtain much from this article then you have to apply these strategies to your won webpage.|
Skeens
Today, I went to the beach front with my children. I found a sea shell and gave it to my 4 year old daughter and said “You can hear the ocean if you put this to your ear.” She placed the shell to her ear and screamed. There was a hermit crab inside and it pinched her ear. She never wants to go back! LoL I know this is completely off topic but I had to tell someone!|
Jasch
Greate pieces. Keep writing such kind of info on your site. Im really impressed by your site.
Dunderman
Its like you read my mind! You seem to know so much approximately this, such as you wrote the guide in it or something. I feel that you simply could do with some p.c. to pressure the message home a little bit, however other than that, that is fantastic blog. A fantastic read. I will definitely be back.
Mosty
Thanks you
Woullard
That is a really good tip especially to those fresh to technology. Simple but very precise info… Thanks for sharing this one. A must read post!
Meteer
What’s up, after reading this remarkable article i am as well glad to share my familiarity here with colleagues.
Minahan
Thanks you
Rosaly Nvesely
Hi colleagues, its fantastic post regarding educationand fully defined, keep it up all the
time.
Alonzo
Have you ever considered about adding a little bit more than just your articles?
I mean, what you say is fundamental and everything. Nevertheless
think of if you added some great visuals or videos to give
your posts more, “pop”! Your content is excellent but with images
and clips, this site could certainly be one of the greatest in its
niche. Awesome blog!